
Arts & Crafts Project Ideas for Thanksgiving
Keep your little ones active during their Thanksgiving holiday with these 7 creative craft ideas.
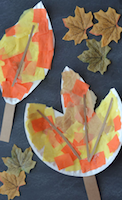
Paper Plate Leaf
Mimic the changing leaves outside with on-hand supplies. Stick to traditional colors or let the kids add extra embellishments like stickers, doodles or glitter glue.
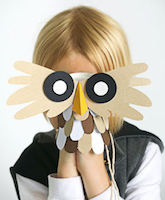
Owl Puppet
Step 1: Get a paper cup, white circular foam stickers, colored paper, black paper, a 1.5-inch hole punch, adhesive and scissors.
Step 2: With scissors, cut out oval feather shapes from colored paper. Glue in layered rows around cup.
Step 3: Trace your kid’s hands and cut out the feathers and a beak. Place round stickers on punched-out “eyes.”
Step 4: Glue eyes onto the feathers. Fold beak and glue it between eyes.
Step 5: Adhere eyes and feathers to top of the cup.
Step 6: All done! Punch two holes facing each other and thread elastic or string through to wear as a hat.

Leaf Sun Catchers
Don’t do all of the prep work yourself. Enlist the kids to rip up tissue paper and they’ll gladly help out. All you need is fall colored tissue paper, contact paper and scissors. An easy project that is fun for all ages!
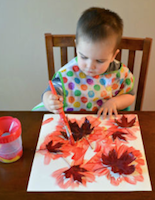
Leaf Painting
Painting on top of backyard leaves creates graphic negative space when you peel them away. Plus, it’s an excuse to head outside and find the necessary supplies. Collect a variety of leaves and let your little one paint with fall colors. When finished painting, simply peel the leaves off of the paper to create a masterpiece!
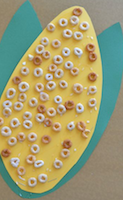
Cheerio Corn on the Cob
Step 1: First draw/cut out your ear of corn out of the construction paper. Yellow for the center and green for the two outer leaves. Now glue/staple those three pieces together to form the corn on the cob.
Step 2: Now put a good layer of glue all over the yellow construction paper piece. Have your child lay the cereal on top of the glue, until it’s completely covered.
Step 3: Set aside to let it dry completely.
Step 2: Now put a good layer of glue all over the yellow construction paper piece. Have your child lay the cereal on top of the glue, until it’s completely covered.
Step 3: Set aside to let it dry completely.
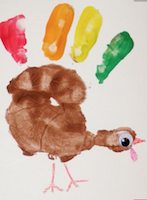
Handprint Turkey
The classic handprint turkey is a simple art project for any age. For younger crafters, you can assist with painting their hands. Older crafters will enjoy taking the brush and painting their own hand.
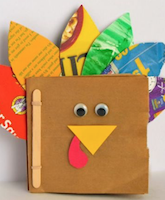
Thankful Turkey Book
Step 1: Gather the necessary materials: 3 brown paper lunch bags , hole punch
 , rubberband
 , craft stick
 , brown, red, and yellow construction paper
 , brown card stock, googley eyes
 , glue
 , scissors
 , and recycled paper or magazine pages.
, hole punch, rubberband, craft stick, brown, red, and yellow construction paper, brown card stock, googley eyes, glue, scissors, and recycled paper or magazine pages.Step 2: Fold each brown lunch bag in half. Punch two holes along the folded edge of the bags.
Step 3: From the back, insert the rubber band through each hole. Insert a craft stick through one loop of the rubber band and then through the other loop.
Step 4: Create the turkey face. Cut a yellow triangle for the beak. From the red construction paper cut the turkey’s wattle. Add googley eyes.
Step 5: Create the tail feathers by cutting a feather shape from recycled paper or magazine pages.
Step 6: Glue the tail feathers to to the back of the last page of the book. Cut a piece of brown card stock paper a little bit larger than the size of the book to cover the back of the tail feathers and help support them.
Step 7: Illustrate your book. Add drawing and writing to the inside pages of the book. Write about what you are thankful for or tell your own turkey story!
For more great Thanksgiving craft ideas, visit goodhousekeeping.com. For full instructions, click on each project picture.